Creating Your WordPress Theme – Part Two
Last week began this series on how to create YOUR OWN WordPress theme!
This week we are going to create the style.css file!
So here is the CSS!
Declare this a THEME!
/*
Theme Name: Your Theme Name
Theme URI: http://yourdomain.com/
Description: A custom design by YOU
Author: YOU
Author URI: http://yourdomain.com
*/
WordPress requires you to put that little chunk of information at the TOP of your style.css so that it can “find” it as a theme.
All Over
/* MAIN*/

body {
      background: #f2f2e8;
      font: 14px Georgia, serif;
      color: #534741;
      text-align: left;
      margin:0;
      padding: 0;
      height: 100%;
      }
#container {
      position:relative;
      background: #f2f2e8;
      margin: 0 auto;
      color: #534741;
      width: 1000px;
      }
a, a:link, a:active {
      color: #e07e0a;
      text-decoration: none;
      }
.clears {clear:both}

.line {
      background: url(/wp-content/themes/tutorial/img/hor-line.png);
      height: 2px;
      width:100%;
      }
This portion of the CSS is “generic”. What I mean by that is all of the code here will affect ALL of the design. It is NOT specific to the blog area, sidebar, header, or footer. We are defining the all over background color, font, font color, and throwing in a height of 100% because that helps the footer after all is said and done.
We are also defining the container div which, as the name suggests, CONTAINS the majority of the markup we will do later.
The class “clears” is to help us keep the content (blog) area and sidebar where they should be. We will go over this a bit more when it comes to the actual markup.
The line class is going to be used in the content (blog) area and the sidebar. You may have noticed it calls for an image file, those will be available to download in a zip file at the end of this post!
The Header
/* HEADER*/

#top {width: 1000px; font-size: 120px;}


#menu {
      position: relative;
      margin:-100px 0 0 625px;
      font-size: 35px;
      color:#036890;
      width: 350px;
      }
#menu a, #menu a:link, #menu a:active {
      text-decoration: none;
      color:#036890;
      margin-right: 1px;
      font-size: 30px;
      }
.menutitle {
      font-size: 40px;
      color: #534741;
      }

Here we are creating the very top part of the design. The header area. This has our blog name in big letters and that navigation menu in the parentheses.
The Content (Blog) Area
/* BLOG*/

#blog {
      float:left;
      margin: 20px 0 0 50px;
      width: 600px;
      }

#blog h1 {
      color:#5f9610;
      font-size: 50px;
      font-weight:normal;
      }
.title {
      color:#5f9610;
      font-size: 60px;
      font-weight:normal;
      float:left;
      width: 400px;
      margin: -5px 0 0 6px;
      }
#blog h1 a, #blog h1 a:link, #blog h1 a:active {
      text-decoration: none;
      color:#8cb206;
      }

.date {
      background: #d8d0a6;
      border-radius:12px;
      -webkit-border-radius:12px;
      -moz-border-radius:12px;
      padding: 3px;
      float: left;
      width: 55px;
      height: 58px;
      font-size: 15px;
      color:#534741;
      text-align:center;
      }

.datetitle {
      font-size: 35px;
      margin-top: -10px;
      color:#534741;
      }

.datemonthday {
      font-size: 20px;
      margin: -10px 0 -6px 0;
      color:#e07e0a;
      }

.commentlink {
      text-align:right;
      font-size: 40px;
      color:#e07e0a;
      }
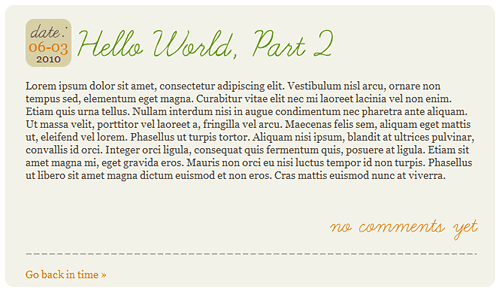
Here we have a few different classes set up just for the date box alone! That is because we want the date title to have different qualities especially since it will be utilizing the WP-Cufon plugin. We also want the month/day portion to be different, in this case with a larger font size and that lovely orange color.
Because we are creating a two column design, having the content (blog) area and sidebar area next to each other, we introduced the “float” attribute.
The Sidebar
/* SIDEBAR*/

#side {
      float:left;
      margin: 20px 0 0 50px;
      padding: 0 10px;
      width: 253px;
      background:url(/wp-content/themes/tutorial/img/vert-line.png)
             repeat-y top left;
      }

#side a, #side a:link, #side a:active {
      color: #17808d;
      text-decoration: none;
      }

#side h3 {
      text-align:center;
      font-size: 35px;
      margin: -10px 0 10px 0;
      font-weight:normal;
      }
.widget {
      padding: 10px 0;
      }
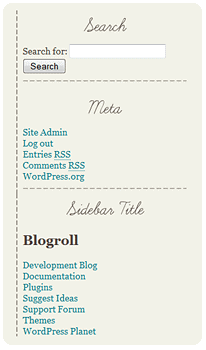
Nothing fancy here, again we are using the float attribute and styled up the color of the links on the sidebar to be that awesome blue color. We also styled the H3 selector since that will also be using the WP-Cufon plugin.
You will also notice again, another image. Here we are creating that vertical dashed line by telling it to display the image on the Y axis (vertical) and to have it start from the top left corner (if you were to imagine a box).
Lastly, The Footer
/* FOOTER*/

#footer {
      margin: 60px auto;
      background:url(/wp-content/themes/tutorial/img/hor-line.png)
            repeat-x top left;
      height: 2px;
      width:1000px;
      }


#copyright {
      background: #d8d0a6;
      border-radius:4px;
      -webkit-border-radius:4px;
      -moz-border-radius:4px;
      padding: 3px;
      margin: 20px auto;
      width: 1000px;
      text-align:center;
      font-size:11px;
      color:#630460
      height:10px;
      }

.box {
      float:left;
      width: 290px;
      margin: -20px 0 0 40px;
      }


.box h3 {
      text-align:center;
      font-size: 35px;
      margin-bottom: 3px;
      font-weight:normal;
      }

Again another repeating image! Here we are doing a dashed line on the X axis (horizontal). We are also creating the CSS for our 3-column footer. The copyright div is just a little area to put your basic copyright information. We are making it rounded with the same background color as the date box.
Now granted, you can get far more fancy, far more crazy, and far more complicated but you don’t NEED to. I go insane when diving into pre-made themes because people can’t customize them! The css is confusing, messy, and generally VERY bloated. I highly suggest taking a peek at your current theme right now, look at the stylesheet, is it easy to read (for the most part anyway!) or bloated and confusing?
So with me so far? Here is the style.css and images for download! Go over the stylesheet and let me know if you have ANY questions!
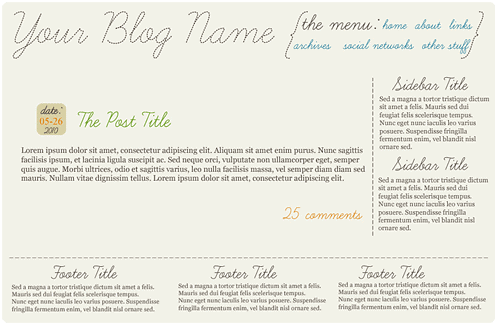
Remember, THIS is what we are trying to achieve!
Next week we are going to tackle header.php!
This post is over a year old which means the content may be outdated or no longer accurate.






I’m so excited that you’re doing this series. Maybe I’ll learn how to understand CSS. haha!
LOL thank you!!
Great tutorial. I agree, I am glad that you are doing this.
Thank you so much!
I am really really ‘considering’ moving to WP from my www.breebee.com blog. I have a url/host package but nervous to move. I don’t want to lose anything & I do want a nicer look. tweeting mama said maybe you could be of assistace? can you or do you help? I like your tutorials and i am willing to try it myself but I am also willing to let someone else do it as well- can we talk?
Hi there! You can check out my Price List for how much I charge for moving blogs, importing posts, and design work!
Woot, another wonderful piece of the series :) Good job <3
Yay thank you!
Yay so going to have to try this after Thursday and I have some free time :) Thank you
You are so very welcome!
i’m so amazed by all this. i do want to make myself sit down and try to make sense of it, though. there must me a method to the madness, right? :)
I think once we get a basic framework up, it will be much more exciting lol.
Now that I’ve read this, I’m off to give it a go. Thanks so much for sharing this! Peace. :)
OK, I’m very new to this stuff and was wondering just how I go about viewing what the finished style sheet looks like? can I view it in my browser, or do I have to view it by uploading it to WP…? Thanks. :)
Well that will be applied in the future tutorials when we dive into the markup of header.php, index.php, and footer.php!
Great, thanks! :)
Another great post, lovely and clear, and really helpful. From someone who has stumbled around on wordpress, learning as I make mistakes, this is a great series… if only I didn’t have to wait for each post :)
Looking forward to the rest of the series
Thank you so much! Lol well I have to hold SOMETHING out each week to bring y’all back!
Great tutorial. When I do mine, I find a very basic pre-made wordpress them and remove all the design stuff and put my own in.
Starting from scratch, which I have never done, seems like it would go more quickly. Looking forward to more tutorials on this!
Im currently working on my blog in wordpress(Although it is not live yet) and i wanted to know if you could help me with how to figure out how to put that gorgeous date settings you have! I LOVE it! If you want I can give you my test site addy :)
Also do you recommend any contact us forms?